Wednesday, October 30, 2013

How to Crop Photos

One of my first photography teachers used to tell me "Just fit what you want in the frame when you take the picture, don't take a picture with an intention to crop to fit the photo in the frame." When I first started and what a lot of people who started photography in the age of Photoshop probably did when they first started. I would take an "okay" picture with quite a bit of dead space and think, "well that's okay I can just crop out the dead space later". The thing about cropping is, if used incorrectly it can ruin your picture and can make it impossible to print. If you are ever working in a setting where you have to send your photos to a graphic design team, believe me when I tell you, you will get a stern talking to from the Artistic Director on the project and have none of your photos used from that first photo assignment you got because all of your photos were cropped to hell.

Now if you still feel like you must crop, there are ways to do it that will not absolutely ruin the photo just follow these few steps.

1. Don't over crop, if you take a picture and it is not quite in the frame how you want it, take it again.

Here's an example from back in 2006 of a picture I just should have taken differently:


Back when I was 15 and first took these photos I am almost positive I thought it was great to get rid of all the extra "dead space" because what I wanted was a tight shot of the bird. Although great in theory, I should I have just taken a tight shot of the bird rather than cropped it like crazy. In this case my cropping made an already bad photo worse.

Now there are going to be times that due to lens restrictions you are not going to be able to get as close as you need to to the subject of the photo. In that case get as close as you can so you do not have to crop so much you ruin the picture or save up for that telephoto lens you want and try to take the pictures at a later date.


Shooting the photo correctly and not just waiting to crop it later on will also save you time during the editing process.

2. Follow the original ratio of the photo.
 
Here's what happens when you do it incorrectly:

This is a photo I took back in 2009, it was my first sporting event. Now please ignore the fact that his stomach is in focus and not his face, because that is not the topic for today. At this point I knew very little about the technical side to photography, but had somehow landed myself a pretty sweet internship. I thought deleting all the dead space in this picture was a good thing. However this photo in fact this was the one that got me the aforementioned speech from the Artistic Director and a new lesson on photo cropping. 
Although some may look at this and think it's a good use of cropping because it shows the action of the photo, the truth is it just distorted the photo and made it unusable.


Here is a correct way to crop your photos:

In this photo there is an extra amount of dead space and the spacing in unintentionally uneven on each side. So I deleted some dead space from the left and top of the photo. If I had just deleted the space from the left side of the photo, it would have changed the ratio of the photo. 
Notice, that I kept with the correct ratio of the photo and did not just crop around the girl.

The finished product is slightly more balanced, but not cropped to the point of distortion.


A few final tips

  • Always save any cropped photos as a duplicate, keep an original copy of the photo
  • Again, don't over crop
  • Keep in mind when shooting what you would like the final photo you would like in the frame
  • Cropping can be useful if used correctly


The necessary disclaimer:

There are some instances where you are designing a project and you need to crop the photo in crazy ways, even though there are rules in photography, sometimes making a square crop is the way you want to show off your art and that's fine. However, if you are doing portraits, weddings, etc. your clients are going to want something they can print and hang up. Also if you are submitting anything to magazines or newspapers, they're also going to want a photo that prints well.

As a follow up I will do a topic on how to crop creatively next week!

Saturday, October 6, 2012

Macro 1

  This is the beginning of a series of posts on Macro, originally I was going to just write one giant post with all the different options from DIY to macro lenses and lighting options, but I decided(mostly having to purchase a few new things and waiting for them to come in decided it for me) it would be best for all if we break it up into some short posts. Now most likely they are not all going to come out one right after the other, there will be 1-2 different topics in between each Macro post.


The first few in this little series are going to be about cheap ways to obtain Macro shots, ranging from reverse lens to close up filters, each obtaining their own post.


A close up filter is basically an in expensive magnifying glass for your lens, a set of four ranging from +1 to +10 will run you about $10-$15. The things I like about close up filters, is they are small and easy to bring anywhere, they are really simple to use, you just have to screw it onto your lens, they fit onto all of my lenses, and they are really cheap. There are, however, quiet a few drawbacks for them. The first one, obviously, being the quality. This really is one of the lowest quality options, you may not be able to get as close up as you would like to without beginning to distort the photo. Also it's not really the best option for getting a true Macro shot, you may pick-up a little extra detail, but it's not going to be as much detail as the other options out there.


Here is a short series of photos I took with +2 to +4 close up filters:


A little extra tip, always have s small spray bottle with some water in your camera bag, this is a tip someone told me a few years ago and it has helped me get some excellent shots. A lot of times I use it for spiderwebs when the sun is hitting them just right. However, I also used it in these photos for the water droplets!


Wednesday, September 5, 2012

Wednesday, August 15, 2012

Long Exposure


   Long exposure photos are one of my favorite to take and to look at.This technique is very self explanatory, you want to set you camera for a long exposure time so it can capture all the available light.  

One of my favorite parts of this technique is "painting" with light. Basically all you do is "paint" with a flashlight/lighter a picture, while the camera is taking the photo.

These are two finished photo's from my living room fireplace. For these two photo's I took multiple exposures of the same area with different parts lit up, then combined them together. The reason I decided to put both in the blog is because I cannot decide which one I like better. I used 3 exposures for each final product.

The one in the right I just drew in the fire. The one on the right is the same original fire but on the mantle I also highlighted the frame, birdhouse, and figure. Let me know what one you like better and why! :)


  Here's how I did it:
       Step One: Set up my tripod and took these 4 photos:


To take these photo's I set my camera for a 30 second exposure time and f/22(If you want a more technical explanation of what an f/stop is, you can read this article http://en.wikipedia.org/wiki/F-number). I did not have my wireless remote, so I had to hit the button then run to the other side of my living room with the lighter(not lit until I got to the fireplace, we must practice safe photography) this is why some are a little shaky. I am sure if my neighbors saw what I was doing they probably would have thought I was crazy, thank goodness for blinds. 

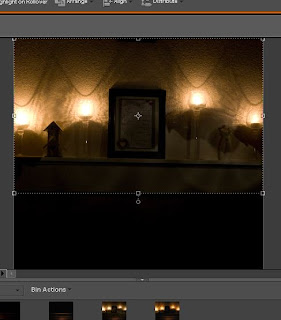
  Step Two: I uploaded them into Photoshop and pretty much cut and paste them together. The tops of the photo's were pretty easy to transfer over:


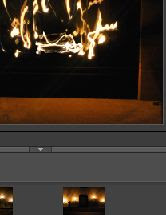
The bottom was a little trickier, mostly because when I first transferred it over it was too big and just looked like it did not belong, so I re-sized it and used the blur tool to blend it all together like this:


Make sure when you go to blend together the layers you select "all layers".

The after that, just make sure all of the new additions to your photo don't leave any unsightly lines that are going to give away the fact that everything was not originally one photo. If you have any of these lines and they are not too noticeable, try to use the blur tool to blur it together.If that doesn't work with out destroying the photo try re-selecting and re-copying over the section of photo you want.


Here is another example of long exposure photography I took form the hill by my apartment. Unlike the above photos it was taken in just one exposure.

Another popular use of long exposure photography is for taking photos of moving water(rivers, waterfalls, etc.) I don't have an example of one of these photo's right now, but I will try to post one soon.

Thursday, November 17, 2011

Fun with Lights

So this is not the official post for the week, that will be here a little later.

However, there is this hill I come over everyday on my way home from work and I have always wanted to play with Bokeh a little more because you come over it and can see all the city lights.

So here one is, enjoy :)


Saturday, November 12, 2011

Time Lapse

Time lapse is a technique which shows a naturally long process in a short amount of time, flower blooming, fruit decaying, sunsets, etc. 

This is a fairly simple process:

The first thing you are going to want to do is pick a subject or project. It can be something you are going to create all together or a natural process. 

After you have your idea in place, choose the amount of time between pictures, this is going to vary depending on what you are doing and how long you want your video to be. Your gap between pictures can be anywhere between a few seconds to a few hours.

Then you will need to set up your tri-pod and take the pictures you need.

After you are done taking all your pictures, you will need to insert them into a program that will play them all together, I know Adobe Photoshop has a program for this as well as Windows Movie Maker.


Here are my projects from the week:

Sunset from my apartment
About 50 pictures were taken  every 2 minutes for an hour and a half


Cleaning the living room.
In this Time Lapse I took some objects right out of the shot so they looked like they just disapeared and slowly moved some objects across the screen so they looked like they were moving on their own.


SCQPAG26GFPZ

Friday, November 4, 2011

Bokeh Filters

Bokeh is where you use a shallow depth of field to create a blur that has a pleasing affect on your pictures. This effect is not necessarily limited to highlights and points of light, however that is where it is most easily recognized. A Bokeh filter is used when you want to take indirect points of light and turn them into shapes or designs.
You can purchase Bokeh filters ( http://photojojo.com/store/awesomeness/bokeh-Kit/) however, they are very simple to make and the homemade ones work just as well.

To make a homemade Bokeh filter:

1. Gather all your supplies:
You will need, a lens of your choosing, the lens here is a Tamron 28mm to 80mm, a piece of dark construction paper(preferably black, but if you are like me and did not have black, any dark color will do), scissors, a surface to cut on(cutting board, piece of cardboard etc.), and a utility or  an exacto knife.

2. Now you want to put you lens face down onto the piece of paper and trace.

3. After you have traced the lens 3 or 4 times(depending on how many shapes you would like to make). Draw a small shape in the middle of the circle. Try making different shapes of different sizes so you can find what will work best for your lens. For what I was using it seemed the smaller shapes I made worked better.

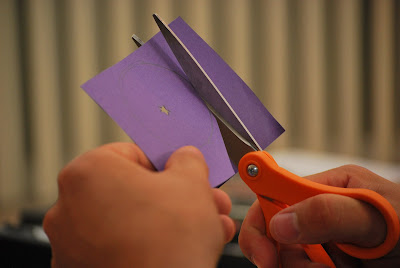
4. Once you have all your shapes, use your knife to cut the shape out of the paper.

5. Now take your scissors and cut the circle out of the paper and cut down until it fits inside your lens.

The cover should just fit right onto your lens.

However, if you accidentally cut your circle too small, cut one strip of paper, place that around the edge where are additional light may come through, and use some delicate tape to tape in place. 

Now find a dark place with some indirect light point and shoot. This technique works the best at night however it can be done during the day as well.
Also depending on the circumstance it may be wise to have a tri-pod with you as you try this, so you can play around with the shutter speeds as much as possible.

Out come:
These were just taken of  the traffic lights next to my house.